The Create Tab Layout
At the top of the Road Constructor panel, the main navigation includes Create, Modify, Junction, Lanes, Markings, Ground, Shapes, Areas, Settings, and Global. For this topic, the focus is the Create tab.
Inside the Create tab, the first row of active workflow buttons includes Create, Adjust, Split Road, and Split Connect. Below those buttons are collapsible categories that organise the tools and settings used while creating roads.

Essential viewport controls
Road Constructor works inside the Unreal Engine editor viewport, so the usual editor navigation is still important. The exact behaviour can depend on the active Road Constructor tool and your editor input settings, but the following controls are the practical starting point for road creation.

Road Setup
The Road Setup category controls the most important starting options for new road creation.
- Open the Create tab.
- Open the Road Setup category.
- Use Refresh Selected if you want to rebuild or update only the selected road-related actor.
- Use Refresh All if you want Road Constructor to refresh all relevant road content in the current scene.
- Choose the Draw Mode, such as Curved Roads, Straight Roads, or Preset Roads depending on the layout you want to create.
- Set Base Height before drawing if the road needs to start above, below, or offset from the detected ground height. Draw Mode defines how new roads are created. Curved Roads are useful for natural bends, sweeping routes, streets, highways, and track layouts. Straight Roads are useful when you need direct point-to-point roads or a clean rectangular plan. Preset Roads are used when you want to place ready-made road shapes or preset road layouts rather than drawing every route manually. Base Height is the starting height offset used when placing road points. It is especially useful when your scene has uneven ground, when you need a road to sit slightly above terrain, or when you want to prepare roads before terrain conforming or deformation. You can fine-tune height later with the available road editing and terrain tools.
Road Drawing Performance
Road Drawing Performance options live in the Create tab and are designed to make road authoring more comfortable on lower-end machines or very busy editor scenes. They affect the live drawing and preview experience only. They do not reduce the final RoadStyle quality once the road is finalised, and they do not change saved road data, generated systems, terrain tools, optimisation output, PIE or Shipping behaviour.

Creating roads
The Create button is the main road placement workflow. Use it when you want to draw a new road into the level.
- Choose the Create tab.
- Press the Create workflow button.
- Open Road Setup and choose the Draw Mode you want.
- Enable Road Drawing Performance options if you need a lighter live drawing preview.
- Choose the RoadStyle you want the new road to use, if the Road Styles category is available for your current setup.
- Move the mouse into the viewport.
- Use RMB to place the first road point.
- Move to the next position and use RMB again to place the next road point. Repeat this for the road route you want to draw.
- Use LMB to finalise or complete the road when the route is ready, depending on the selected draw mode.
- For Curved Roads, place points in a way that follows the intended bend. The live preview helps you see the expected road width and curve before committing placement.
- Use the mouse wheel to adjust pending point height where height authoring is active. Watch the viewport labels if height or length labels are enabled in Debug.
- Use Escape if you started in the wrong location or selected the wrong draw mode. After a road is created, it can be selected, refreshed, adjusted, split, connected, styled, conformed, deformed, or prepared for optimisation workflows depending on the task you are working on.
Adjust
Adjust is used when a road already exists and you want to refine it instead of creating a new one. It is the natural next step after placing a road that is close to correct but needs small edits.
- Select the road you want to work on.
- Press Adjust in the Create tab workflow row.
- Use the viewport editing handles or editable road points provided by Road Constructor to refine the road layout.
- Use LMB for selection and point interaction.
- Use MMB and standard viewport navigation to reposition the camera while checking the road from different angles.
- Use Refresh Selected if the road needs to be rebuilt after significant edits.
Split Road
Split Road is used when a road should become separate road sections. This can be helpful for layout organisation, road network editing, transitions, junction preparation, or separating sections that need different styling or terrain treatment.
- Select the road you want to divide.
- Press Split Road.
- Use the viewport to choose the intended split position. LMB is used for the split interaction when the tool is active.
- Check the resulting road sections after the split.
- Use Refresh Selected or Refresh All if the scene needs a rebuild after the operation.
Split Connect
Split Connect is related to splitting, but its purpose is more connection-focused. Use it when the split is part of preparing a road to connect with another road, junction, or road network workflow.
- Select the road that needs a connection-ready split.
- Press Split Connect.
- Use the viewport to indicate the split/connect position with LMB when the tool is active.
- Check the result before continuing with junction or connection work.
- Use Adjust afterwards if the connection location needs refinement.
Placement Props
Placement Props controls RoadStyle-driven placement and generated categories that may be created or updated with the road. The quick presets are Safe, All On, and All Off, plus Use Full Road Style Props and individual category filters.

The Current Placement Filter readout is a useful safety check. It tells you which generated or placement categories are currently allowed, such as generated railings, curbs, road markings, shoulders or rumble strips, medians or traffic islands, drainage or gutters, road furniture, edge details, and road wear or detail layers.

Road Styles
RoadStyles are one of the most important parts of Road Constructor. A RoadStyle controls the character of the road, including lane layout, surface behaviour, sidewalks or shoulders, generated categories, road markings, railings, curbs, and other visual systems where configured.

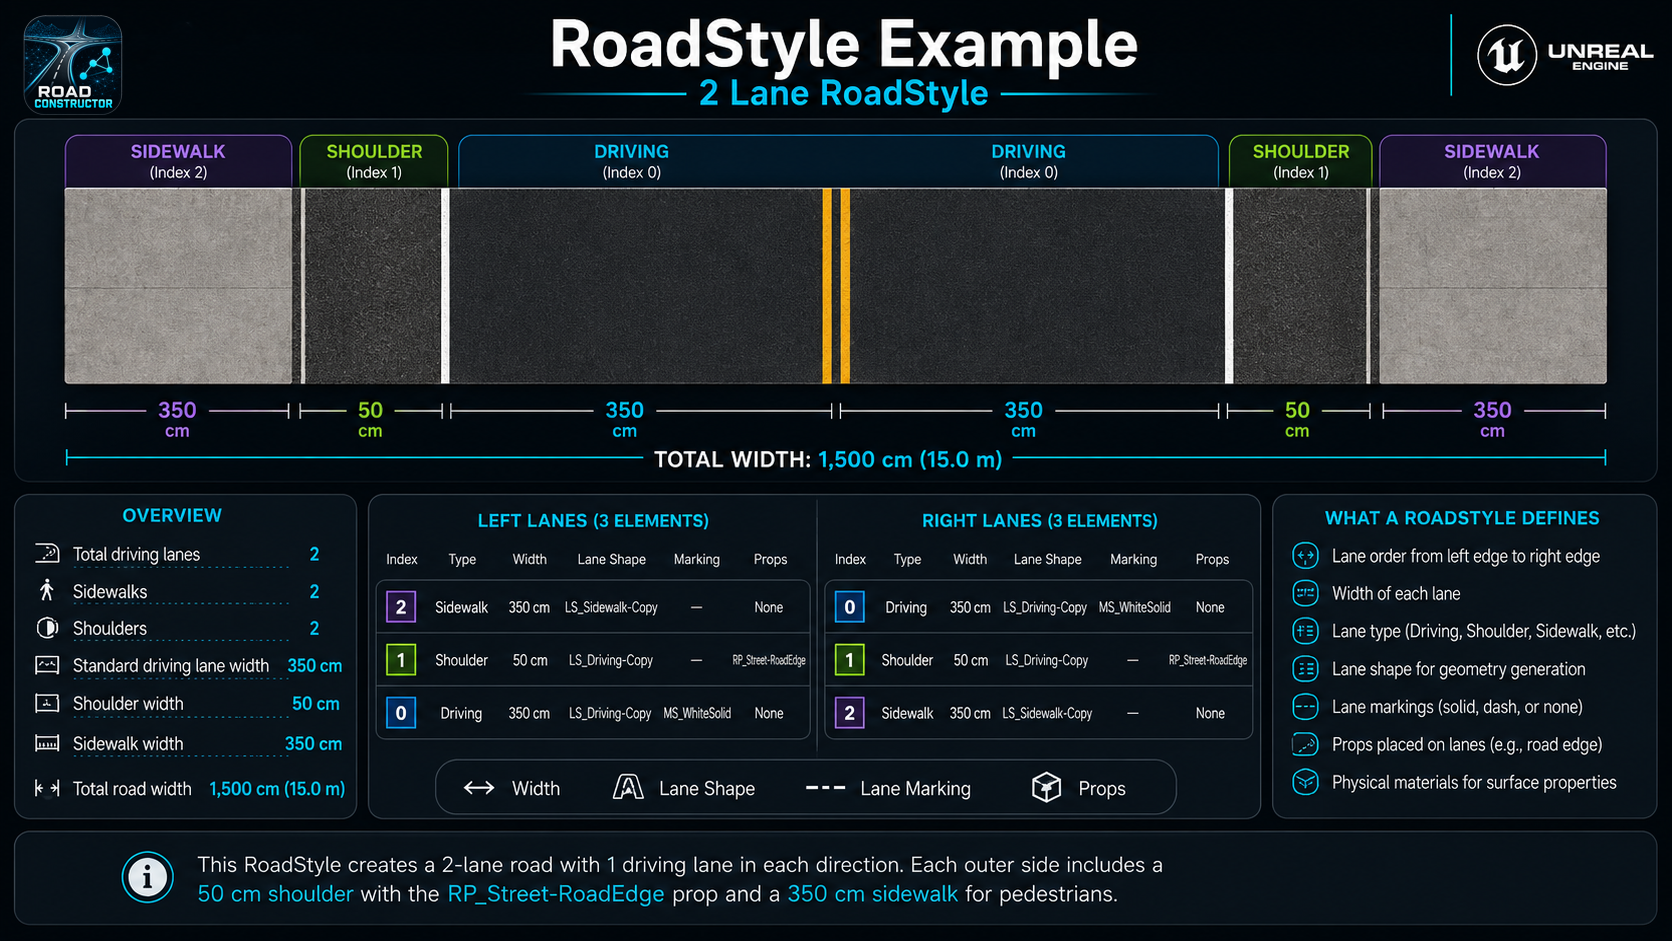
For basic use, choose the RoadStyle that most closely matches the road type you want before you start drawing. For example, choose a street RoadStyle for an urban road, a highway RoadStyle for a wide traffic route, or a custom RoadStyle if you have already created one for your project.
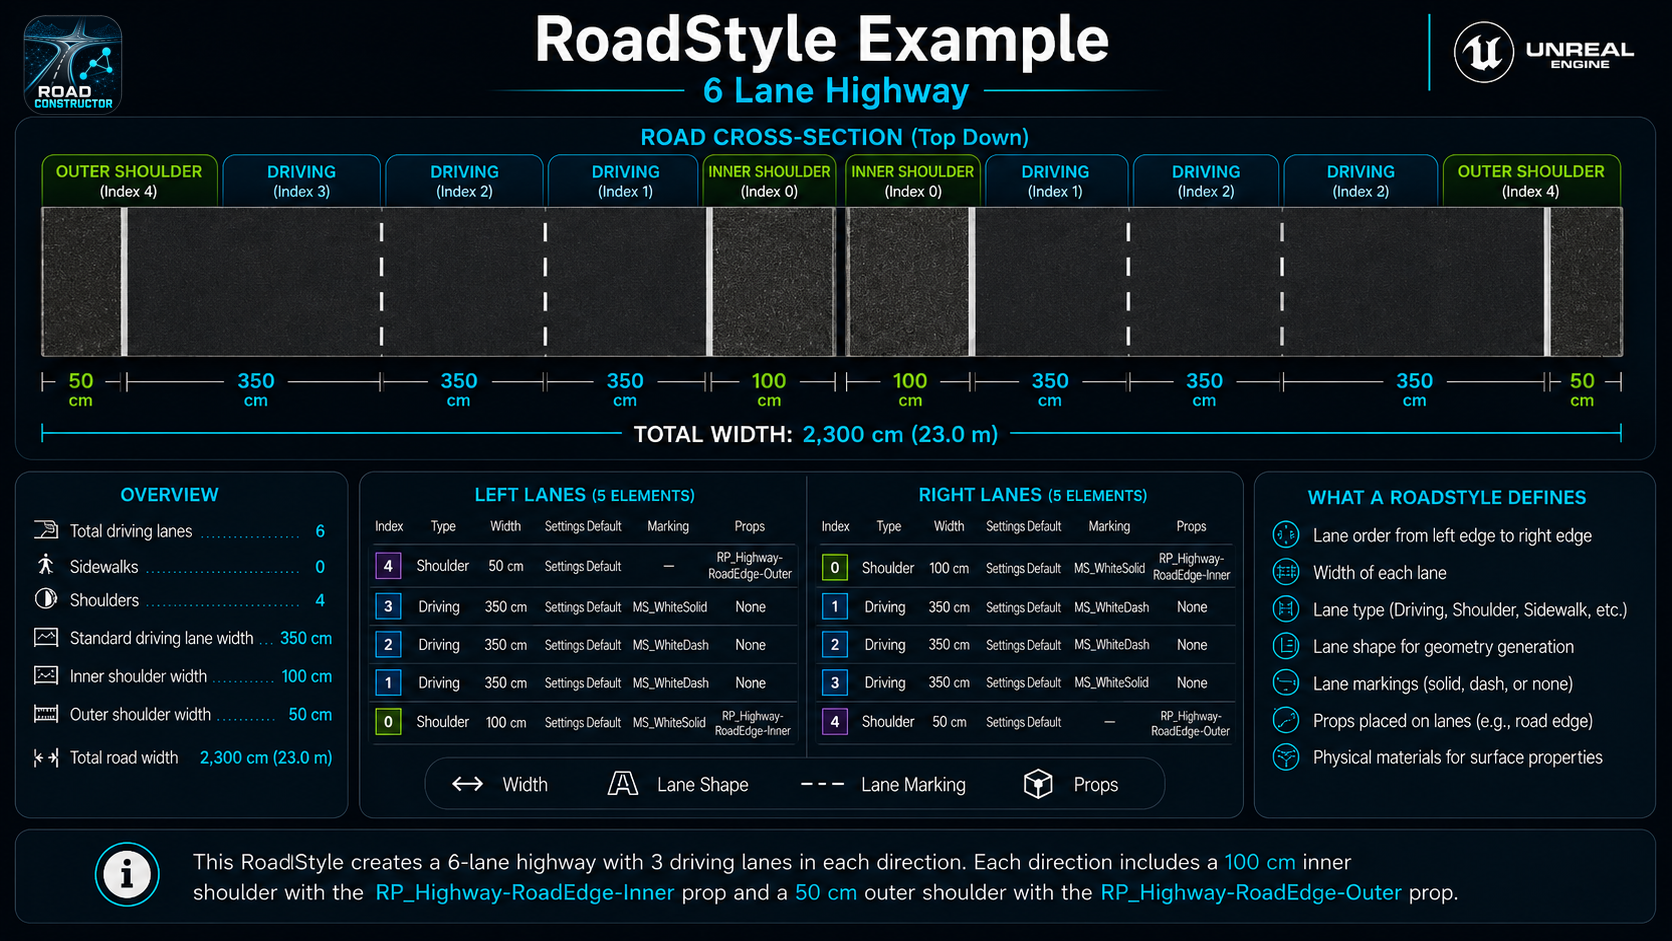
Because RoadStyles drive so much of the generated result, changing the RoadStyle can affect more than the road material. It can also influence lane count, generated details, markings, width, and how other systems interpret the road.
SVG Import
SVG Import lets you import SVG paths as Road Constructor roads. This is useful when you already have a road plan, map, race track, city block layout, or design sketch prepared as vector paths.
- Open the SVG Import category.
- Press Import SVG Roads.
- Choose the SVG file when the import dialog opens.
- Set the import RoadStyle, Base Height, and Corner Radius options in the import dialog as required.
- Review the imported roads in the viewport.
- Use Adjust, Refresh Selected, Refresh All, or terrain tools afterwards if the imported layout needs refinement. The import dialog uses its own RoadStyle, Base Height, and Corner Radius settings. Imported SVG roads can also be placed at the origin with a chosen anchor, so check the imported location after the operation. If the import appears away from the expected area, look around the level origin and then move or adjust the resulting roads as needed.
Road Presets
Road Presets are ready-made road icons or preset layouts. The Road Presets category notes that preset icons are available when you switch Draw Mode to Preset Roads.
- Open Road Setup.
- Change Draw Mode to Preset Roads.
- Open Road Presets.
- Choose the preset you want to place.
- Follow the active preset placement prompt in the viewport. For standard road-point drawing workflows, RMB places points and LMB finalises the road.
- Use mouse wheel rotation if the preset placement mode supports it.
- Use Adjust after placement if the preset needs to be moved or refined.
Debug
Debug options help you understand what Road Constructor is doing while you create roads. They are especially useful when learning the tool, checking road point height, checking road length, or making sure the correct road is selected.
- Road point height labels help show the height of placed or pending road points.
- Road point length labels help show the length of a road or the pending length while drawing.
- Quick Edit display options can make editing panels easier to access while working.
- Viewport labels and previews are useful for checking a road before finalising the route.
Road Transition
Road Transition is used to transition a road from one RoadStyle toward another RoadStyle. A common use is merging a wider road down into a smaller road, such as a multi-lane road merging into fewer driving lanes.
- Select the road that needs a transition.
- Open the Road Transition category.
- Enable Road Transition.
- Choose the target RoadStyle for the transition.
- Set the transition range and related options if available.
- Use the transition action to apply the change.
- Review the viewport guide and resulting lane merge.
- Clear the transition if the result does not match the intended road design. The Road Transition section includes an important warning: extreme transitions may not yield required results. Use sensible transitions that make design sense. A high-to-low merge is usually a more practical use case than trying to expand a road into a more complex layout without enough design space.
Terrain Conform
Terrain Conform adjusts the selected road height to the landscape. Use this when the road itself should follow the ground height more closely.
- Select the road to conform.
- Open Terrain Conform.
- Enable the tool.
- Use the conform action provided by the panel or shortcut workflow where available.
- Check the road in the viewport from several angles.
- Refresh the selected road if required. Terrain Conform is road-focused. It adjusts the road to better match the terrain. This is different from Terrain Deform, which is landscape-focused and changes the terrain shape around the road.
Terrain Deform
Terrain Deform is used when you want the landscape to be shaped around the road. The Create / Update Landscape Spline Deform action creates or updates the landscape spline deformation associated with the selected road workflow.
- Create or select the road you want the terrain to follow.
- Open Terrain Deform.
- Enable Landscape Spline deformation.
- Press Create / Update Landscape Spline Deform.
- Review the result in the viewport.
- Save and reload when testing persistence-sensitive terrain work. Terrain Deform is best used after the road route is mostly decided. If you deform terrain too early and then make large road changes, you may need to update the deformation again.
Terrain Foliage Exclusion
Terrain Foliage Exclusion helps prevent foliage from visually clashing with the road area. It is useful when roads pass through grass, forest, scattered vegetation, or any terrain area where foliage would otherwise appear through the road surface or shoulder area.
- Select or create the road that needs foliage exclusion.
- Open Terrain Foliage Exclusion.
- Enable the tool.
- Press Create / Update Terrain Foliage Exclusion.
- Review the cleared or excluded area around the road.
- Use Clear Foliage Exclusion if you need to remove the exclusion result and return to an editable state. For best results, apply foliage exclusion after the road position is stable and before final visual review of the environment.